BotQueue version 1 was a great proof of concept. You could upload gcode files, and they would be distributed across multiple machines for printing. It served that purpose well, and I received great feedback from the community as a result. In particular, a major request was to integrate slicing into the BotQueue flow so that a user could upload an STL file directly.
Well, ask and ye shall receive! Today I’m proud to announce that BotQueue now supports online slicing with Slic3r, the wonderful open source slicing tool. With this release of BotQueue, we are supporting the latest version of Slic3r (0.9.8) although if there is interest, I could add support for previous versions of Slic3r as well.
Here’s a quick overview of how this process works:
- You upload an STL or OBJ file to BotQueue.com
- Bumblebee (the BotQueue client) downloads and slices the 3D model into GCode.
- Bumblebee uploads the GCode back to the site for re-use by your other printers w/ the same config.
- Bumblebee executes the GCode created by Slic3r.
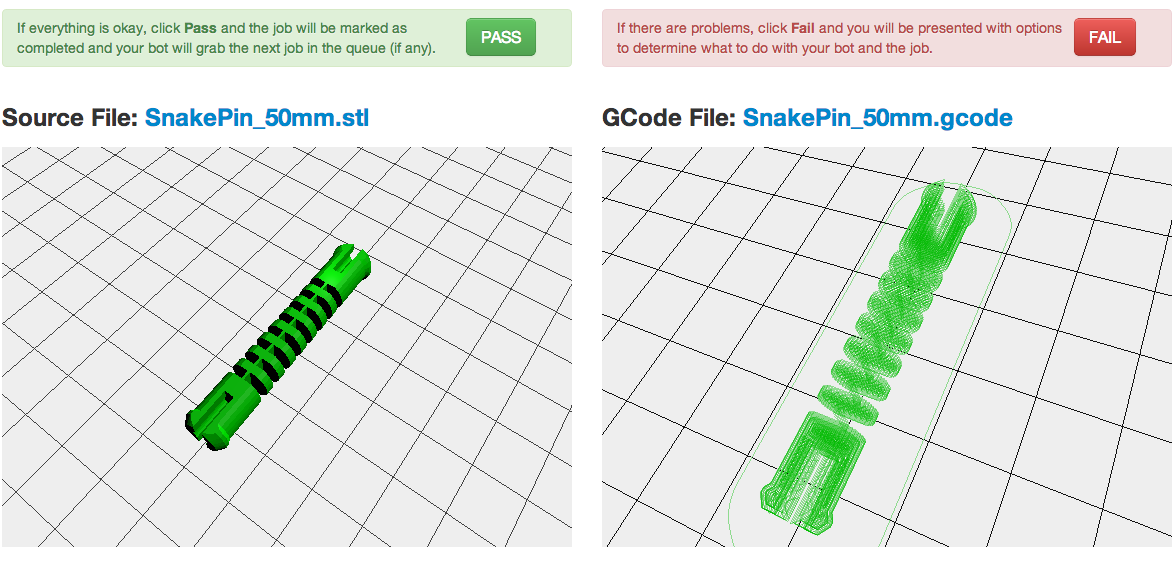
Now, what if a slicing job goes wrong and Slic3r reports some errors? This is where two wonderful open source projects come to save the day. First, the wonderful Thingiview.js plugin by Tony Buser. Second, the most excellent GCode Viewer plugin by Joe Walnes. If there is a problem with the GCode parsing, BotQueue will take you to a page where you can view the model and the gcode output to verify if it is correct or not. Both of these plugins require WebGL to function properly, so make sure you have the latest FireFox, Chrome, or Safari installed.
This latest feature has been designed with you in mind. I know that everyone has their favorite slicing engine, and their own custom configuration file. BotQueue makes it ridiculously easy to manage all that. The new slicing functionality is based around the idea of SliceEngines and SliceConfigs. A SliceEngine is something like Slicer-0.9.8 or Skeinforge-0050. A SliceConfig is the unique settings that you decide for a SliceEngine. You can have as many SliceConfigs as you like.
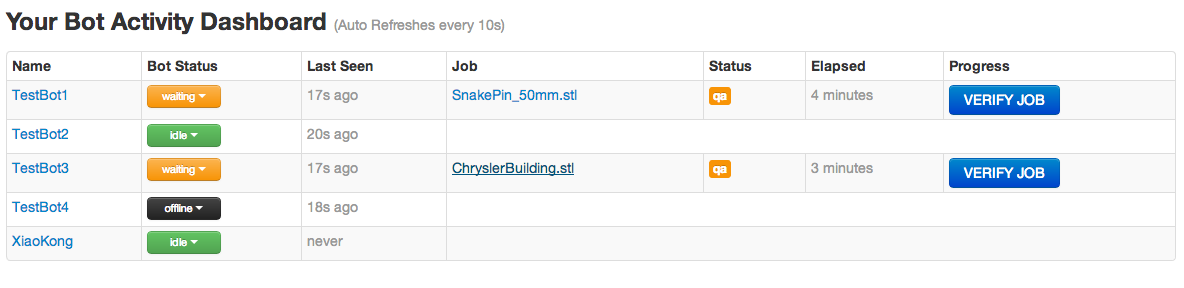
Each bot is configured to use a particular SliceConfig. When a bot grabs a new job, it will start the slicing process. First, it looks to see if that particular model has been sliced with its assigned SliceEngine and SliceConfig. If it finds that, it can skip the whole process and use the pre-sliced gcode. If not, it will download the 3D model and slice config and then slice the model into GCode accordingly. Once it finished the slicing, it will proceed to print the resulting gcode.
This is awesome in so many different ways. Let me count them for you:
1. All you do is upload an STL and it will automatically get printed. Configure your bots once and then FORGET ABOUT SLICING FOREVER.
2. You can have 1 slice profile tuned to each bot, and BotQueue will intelligently choose the right engine and config to use when slicing. No more dealing with 4000 configs and remembering what is what.
3. If you change a config, you can “expire” previously sliced jobs. No more stale GCode files laying around.
4. Online viewer for both the GCode and 3D model. You don’t need to install any client software just to look at a print job.
Currently Supported Slicing Engines:
- Slic3r-0.9.8
- older versions of slic3r on request
- Pull requests to add new slicers gladly accepted!
Important – Upgrading to v2
First, get Slic3r running. BotQueue is currently on 0.9.8 and we’ll be continually adding whatever the latest version is. After that, you will need to upload your configuration(s) to BotQueue from the relevant slice engine page. You can export the config from within the Slic3r program. If you don’t have a config for Slic3r, then the default one is a good place to start. You will use Slic3r to change any configuration options, or you can edit the config by hand online.
Second, edit your bots in the web interface and choose the appropriate slice engine and slice config for each bot.
Third, upgrade your BumbleBee installation to version 0.1.0. Download the file, extract it, and then run it from the commandline like normal. You will need to copy over the config.json file from your old Bumblebee install.
Congratulations, you can now slice and print jobs through the internet.
Warning: The previous BumbleBee from v1 is now obsolete. Do not use it again! Delete the old folder!
When i use Gcode sliced by others. How is security guaranteed so i don’t use malicious Gcode that might brake my bots.
Also more of a feature request. Next to each bot id like to install a paper printer to print related shipping information. It would be really neat to integrate BotQueue in that workflow.
1. don’t use a public profile and all the slicing will only happen on machines that you control. i may even disable public profiles since the software isn’t too mature right now.
2. that is very interesting, but i won’t be implementing that into botqueue directly. i want to keep it a purely 3d printing / digital fabrication focused app. if you have separate business needs, there are apis you can integrate with it.
Hi Zach, consider to take a look at Remote Slicing Protocol https://docs.google.com/document/d/1J5BVSAvlerSi_R8ItUG1gO_hi06zXSqL1HrHaOYZ8iw/edit# in the working, your input would be most welcome. The main aim is to define an open protocol to relay slicing to other servers (just slicing, nothing else, not printing or remote control) — Rene
PS: G+ thread at https://plus.google.com/u/0/107231616552201283604/posts/bcD3CjUk7yh